01Introduction
Would you like to tag the objects in a photo taken on your mobile phone before posting it to your Facebook account? With the available TensorFlow libraries with Javascript support and a pre-trained model for object detection, this has become a trivial task. To give you a real feel of what it looks like in your mobile browser open this URL where I have already posted the application. Here are some of the application screenshots taken from my mobile.
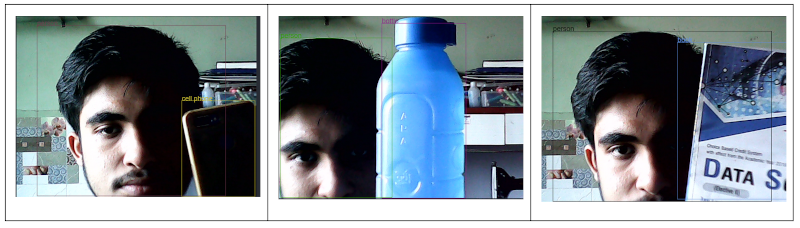
As the images show, the application detects a cell phone, a water bottle and a book along with I as a person, of course. The ML model we use in this application detects almost 200 different types of objects. Having seen what you are going to achieve, let us look at how to achieve it.
Incidentally, we have several tutorials on object detection, segmentation and real time tracking previously published on our blog site. The application that I am going to describe here is rather primitive in the sense that it does not contain the advanced features that our published tutorials contain. So, you may like to refer to these tutorials for adding more features to this skeleton application.
02Creating Application
The object detection application is a web application that uses TensorFlow.JS for using pre-trained ML models and React.JS for web development. We will use the COCO SSD pre-trained model that can detect objects in both still images and a live video. To learn more about COCO, refer to our earlier tutorials, which are listed in the reference section of this article. So, let us start with the development.
Note: Download the project source as you will be using the App.js file from it directly.
03Creating React App
We will use node.js, which is an asynchronous event-driven JavaScript runtime, designed to build scalable network applications. We will use React for creating interactive UIs.
Download nodejs from the official site[1].
To create a new React app run the following command on your command prompt:
npx create-react-app realtimeobjectdetectionThis will create a React app with the specified name. Your folder structure will look like this at this point:
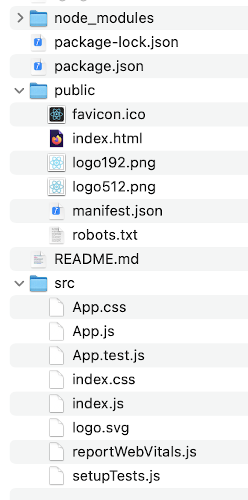
Our application will need few packages for video capture and object detection from TensorFlow libraries. In the package.json file, add the following dependencies:
"@tensorflow-models/coco-ssd": "^2.1.0",
"@tensorflow/tfjs": "^2.4.0",
"react-webcam": "^5.2.0",
"react-cam": "1.1.11",
"axios": "^0.21.1"
Install the dependencies by running the following command:
npm installReplace the App.js file with the one from the downloaded source. I will explain the code in App.js after I show you how to run the application.
Run the application with the following command:
npm startThis will open the browser window with the url - localhost:3000. You will be asked to grant access to a webcam and microphone. When you do so, you will see the live video stream with your own face being detected. Take a bottle of water or a cellphone and you notice that these objects too are detected.
I will now explain how the code works.
04Understanding App.js
First, we import React, TensorFlow JS library and coco pre-trained models.
import React, { useRef } from "react";
import * as tf from "@tensorflow/tfjs";
import * as cocossd from "@tensorflow-models/coco-ssd";
The COCO pre-trained model is used for object detection, creating bounding rectangles on detected objects, and predicting class probabilities for each detected object.
To use the webcam in our application, do the following import:
import WebCam from "react-webcam";Lastly, we import the application specific files.
import "./App.css";
import "react-cam";05The App Function
In the App function, we get the webcam reference and a reference to canvas for displaying the video.
function App() {
  const webcamref = useRef(null);
  const canvasref = useRef(null);
We begin the video detection by defining an asynchronous loop:
const detect = async (net) => {We first check if webcam is ready to capture video:
if (
typeof webcamref.current !== "undefined" &&
webcamref.current !== null &&
webcamref.current.video.readyState === 4
){
We will use canvas for displaying the video. We set its height/width to the current video frame.
canvasref.current.width = webcamref.current.video.videoWidth;
canvasref.current.height = webcamref.current.video.videoHeight;
We obtain the video frame from the current video by calling detect:
const obj = await net.detect(webcamref.current.video);We get the context and display the frame in the context by calling the drawBoxes method:
const ctx = canvasref.current.getContext("2d");
drawBoxes(obj, ctx);
I will now discuss the drawBoxes function.
06Drawing Boxes and Displaying Classnames
We declare the drawBoxes as follows:
const drawBoxes = (detections, ctx) => {For each detected object, we find its bounding box and the class name.
detections.forEach((prediction) => {
// Extract boxes and classes
const [x, y, width, height] = prediction["bbox"];
const text = prediction["class"];
In this program, I am marking out only three types of objects. Coco detects about 200 different types of objects. You may check this site[2] for more information.
var color;
if (text === "Person") {
    color = "#66ff66";
} else if (text === "Bottle" || text === "bottle") {
    color = "#4d4dff";
} else if (text === "Book" || text === "book") {
    color = "#ffff00";
}
Depending on the type of object, we select the color for the bounding box. Finally, we draw the box and write the class name using following lines of code:
      ctx.strokeStyle = color;
      ctx.font = "24px Arial";

      // Draw rectangles and text
      ctx.beginPath();
      ctx.fillStyle = color;
      ctx.fillText(text, x, y);
      ctx.rect(x, y, width, height);
      ctx.stroke();
Next, we write a function for detecting objects
07Object Detection Function
  const runCoco = async () => {
    const net = await cocossd.load();
    //  Loop and detect objects in realtime
    setInterval(() => {
      detect(net);
    }, 10);
  };
The function first ensures that the pre-trained model cocossd is loaded. It then calls detect every 10 seconds for capturing the video and displaying it on canvas along with the detected objects in it.
Finally, we call the runCoco function as a part of application startup.
runCoco();At the end, return the WebCam and canvas element references:
return (
    <div className="App">
      <header className="App-header">
        <WebCam
          ref={webcamref}
          muted={true}
          style={{
            position: "absolute",
            marginLeft: "auto",
            marginRight: "auto",
            left: 0,
            right: 0,
            textAlign: "center",
            zindex: 9,
            width: 800,
            height: 800
          }}
        />
        <canvas
          ref={canvasref}
          style={{
            position: "absolute",
            marginLeft: "auto",
            marginRight: "auto",
            left: 0,
            right: 0,
            textAlign: "left",
            zindex: 8,
          }}
        />
      </header>
    </div>
  );
Finally, comes the most important part and that is deploying the application on the cloud.
08Deploying on Cloud
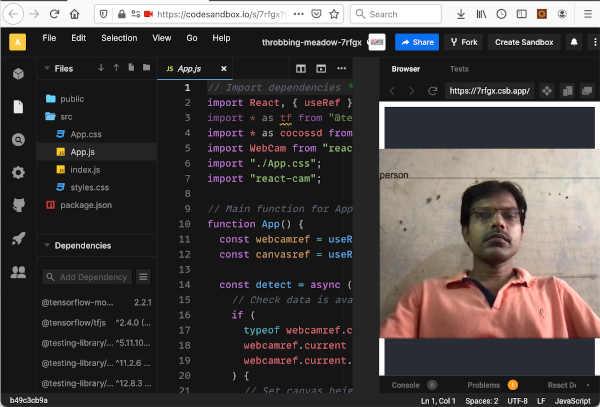
For deploying your application on the cloud, you would need your own web server running in the cloud. I will show you a simpler way of deploying it on a cloud for testing your application. The CodeSandbox[3] is an online code editor and prototyping tool that makes creating and sharing web apps faster. It allows you to add a project from your GitHub repository into a sandbox for testing and collaborative development. I have uploaded our project in such a sandbox. The sandbox generates an URL for your application and that is the URL that I have specified in the introduction part of this tutorial. You may examine the code and experiment with it for your learning. This is the link to my sandbox. After opening this link, click on the open Sandbox link at the right-hand bottom of the displayed page and you will see the entire project code as shown below:
09Summary
In this short tutorial, you learned how to create a trivial ML application and deploy it on the cloud. The application is easily accessible to any web browser, including the one in your mobile phone. You used React for web application development and cocossd pre-trained library for object detection. We deployed the application on CodeSandbox for testing and easy worldwide access.

Jayanta Ghosh
Project idea and development. M.Sc. Computer Science, Ramnarain Ruia Autonomous College, Mumbai.
1 article on ABCOM Education