01Introduction
Object detection and tracking is the need of our modern day life. Without it, you cannot do effective security surveillance, driving autonomous cars, resolving traffic congestions, and even creating robots that could mingle with our society. You may also like to develop a machine learning model that delivers a running commentary on a live football game or a cricket match. To meet this requirement, you would need to track the ball, the player, the bat, etc in actual time. There are several areas where we require object detection and tracking in actual time.
In this tutorial, I will show you object detection using YOLO. YOLO (You Only Look Once) is a state-of-the-art, real-time object detection system. YOLO V3 can recognize 80 different types of objects in images and videos, it is super fast. Thus it is an excellent choice when you need real-time detection, with a real good accuracy. For more information, visit YOLO’s official website - YOLO[1]. I will also give you the latest enhancements in Yolo, that is YOLO V4. I will show you how to detect objects in a still photo, in a recorded video and also in a live video stream. In the second part of this tutorial, I will discuss image segmentation on detected objects and in the third I will show you the real time tracking of objects.
02Installing Software
The YOLO model is obviously trained on a large DNN. Fortunately, the author who trained this model has provided us the configuration and weights for us to recreate the model on our machine. The configuration file defines the DNN architecture, and the weights initializes it to the pre-trained state. An image processing model works on fixed size images. The author has provided the weights for the model trained on 320x320 pixels besides the others. We will use these weights. This is the screenshot of the source site.
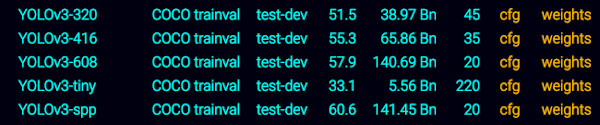
Download the configuration and weights files for image size of 320x320 pixels. You will also need the COCO dataset names file that contains the names of all classes (recognized objects.) Besides these, also download the weights for the YOLO V4 model - we will also use this model in our tutorial. Last, download the project source.
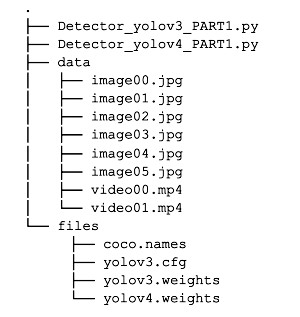
NOTE: After downloading these files, save them in your project folder, as shown in the folder structure here:
Additionally, you will need to install the YOLO V4 package on your computer. You do this using pip install:
pip install yolov4Now, you are ready to build your project.
03Object Detection Using YOLO V3
Create a project using any of your favorite IDE, such as Anaconda, Sypder. Alternatively, you may use a simple Python editor to try out this project. The project comprises just two Python files, one for running Yolo version 3 and another for version 4.
04Importing Libraries
Import the following libraries:
import numpy as np
import cv2
import warnings
warnings.filterwarnings('ignore')05Getting Classnames
The YOLO object detection model was trained on Microsoft COCO[2] (Common Objects in Context), which is a large-scale object detection, segmentation, and captioning dataset. It identifies 80 different types of objects, such as truck, boat, bench, bird, dog, and horse. They provide these names in a file called coco.names. Load these names into your project using following code:
classnames = []
with open('files/coco.names') as f:
    classnames = f.read().rstrip('
').split('
')
First, I will show how to use YOLO V3, followed by version 4 implementation.
06Defining Network
Your first task is to recreate the network with the provided configuration and weights. We do this using the following statement:
nnet = cv2.dnn.readNetFromDarknet('files/yolov3.cfg', 'files/yolov3.weights')If you have GPU available on your machine, use it by adding the following statement:
nnet.setPreferableBackend(cv2.dnn.DNN_TARGET_OPENCL)Before we write the object detection code, let us develop a utility function for drawing a box around the detected object.
07Function for Drawing Boxes
We write a function called findObjects that takes an image as its input parameter and changes it by adding the bounding boxes around the detected objects. We will define two variables for use within the function.
conf_thresh = 0.29
nms_thresh = 0.3
These decide on the confidence level of detection and the threshold for selecting the best bounding box out of all the overlapping bounding boxes for a particular object.
I have given below the full function definition; if you don’t understand it, that’s fine I’ll be explaining it after showing you how the objects are detected. I just included the definition here because that is the order of appearance in the source file.
def findObjects(outputs, img):
#getting the dimensions of the original image
target_height, target_width = img.shape[:2]
bbox = []
classIds = []
confs = []

for output in outputs:
    for d in output:
        scores = d[5:]
        classId = np.argmax(scores)
        confidence = scores[classId]
        if confidence > conf_thresh:
            w,h = int(d[2]*target_width), int(d[3]*target_height)
            x,y = (int(d[0]*target_width) - w/2), (int(d[1]*target_height) - h/2)
            bbox.append([x,y,w,h])
            classIds.append(classId)
            confs.append(float(confidence))

indices = cv2.dnn.NMSBoxes(bbox,confs,conf_thresh,nms_thresh)
print(f'Number of detected objects: {len(indices)}')

for i in indices:
    i = i[0]
    box = bbox[i]
    x,y,w,h = int(box[0]),int(box[1]),int(box[2]),int(box[3])
    #print(x,y,w,h)
    cv2.rectangle(img,(x,y),(x+w,y+h),(255,0,255),2)
    cv2.putText(img, f'{classnames[classIds[i]].upper()} {int(confs[i]*100)}%',(x,y-10),cv2.FONT_HERSHEY_SIMPLEX,0.6,(255,0,255),2)
Now, we will start with the actual object detection code. I have created a trivial user interface that allows the user to select the type of input - image, video or webcam.
inp = int(input('Choose the input source for object detection:
 1.Image
 2.Video
 3.Webcam
'))
First, I will discuss object detection in a still image.
08Detecting Objects in an Image
Create a variable for the image size and set its value to 320. Remember, we are using the YOLOv3-320 model version. If you use any other version, change the size accordingly.
if inp == 1: #for image
input_size = 320
Load the image data using the imread function of OpenCV. The image00.jpg is an image file downloaded as a part of source download. When you use another file for testing, do not forget to set the proper path and filename in the code below.
image = cv2.imread('data/image00.jpg')To see the image, call imshow method.
cv2.imshow('Image',image)The image is shown below for your reference:

Convert the original image to size 320x320 as a binary object and set it as input to the network.
 blob_img = cv2.dnn.blobFromImage(image,1/255,(input_size,input_size),[0,0,0],1,crop=False)
nnet.setInput(blob_img)
Fetch all the layers in the neural network, i.e the input, hidden and the output layers.
layerNames = nnet.getLayerNames()As a curiosity, you may try printing this list. It is a huge list comprising several layers. The network architecture is surely quite complex.
Retrieve the output layers
outputNames = [layerNames[i[0]-1] for i in nnet.getUnconnectedOutLayers()]Print the names of these output layers.
print (outputNames)This is the output:
['yolo_82', 'yolo_94', 'yolo_106']You may wonder why three output layers? The YOLO design and working is unique. It splits the original image into three different sizes and performs object detection on each size independently. That’s how it can achieve better accuracy and a fast performance. I will explain this working in more detail later.
Apply the forward pass/propagation in our neural network by passing these output layers. We do this to get the outputs of only these layers. The output would contain the information on the detected objects.
objectInfo = nnet.forward(outputNames)Call the earlier defined findObjects method that takes these output layers as the first argument and the desired image for object detection as the second parameter.
findObjects(objectInfo, image)Now, let us check what each output layer has delivered to us. Print the dimensions of each of the outputs.
  print (objectInfo[0].shape)
print (objectInfo[1].shape)
print (objectInfo[2].shape)
The output is:
(300, 85)
(1200, 85)
(4800, 85)
Each array element of objectInfo has a shape of (X,85), i.e X rows and 85 columns.
To understand what the value of X will be, first let us understand the YOLO v3 architecture a bit. First, this neural network architecture has 3 output layers. After passing in the 320x320 image, and since we are using the 320x320 YOLO weights and configuration files, the entire image gets broken down into several smaller images, and we look each smaller image at to get predictions. We do this dividing of the image into smaller images three times, and hence we are getting 3 output layers. The first layer contains the predictions when the primary image was divided into several 10x10 images (for different variants like YOLO 416x416, this may vary according to the stride. The stride for the three layers is 32, 16, 8. Hence for a 320 x320 image we will get a 10x10 image when stride is 32 (320/32 = 10). Similarly, the next output layer has predictions, when the image got broken down into 20x20 images and same is the case for the 3rd output layer 40x40. Hence X changes according to the 3 output layers, i.e. when images are divided into 10x10, 20x20 or 40x40.
I will now explain what those 85 columns are. The 85 columns are comprised of
- The 4 coordinates (x, y, x+width, y+height) of a bounding box,
- Confidence value of being an object (from the 80 coco classes) and
- The next 80 values are the confidence values for the 80 different classes of objects, where 0 means the object does not match or has a 0 confidence value for the corresponding class, while a value greater than 0 gives the confidence value of that object for being that class. These 80 columns are arranged according to the classes in ‘classnames’.
Thus, summing up to 4 + 1 + 80 = 85.
The findObjects method uses these outputs and marks the rectangles on the detected objects. I will explain the findObjects method soon.
Now, draw the image on the screen to display the detected objects along with their bounding rectangles. We show here the output:
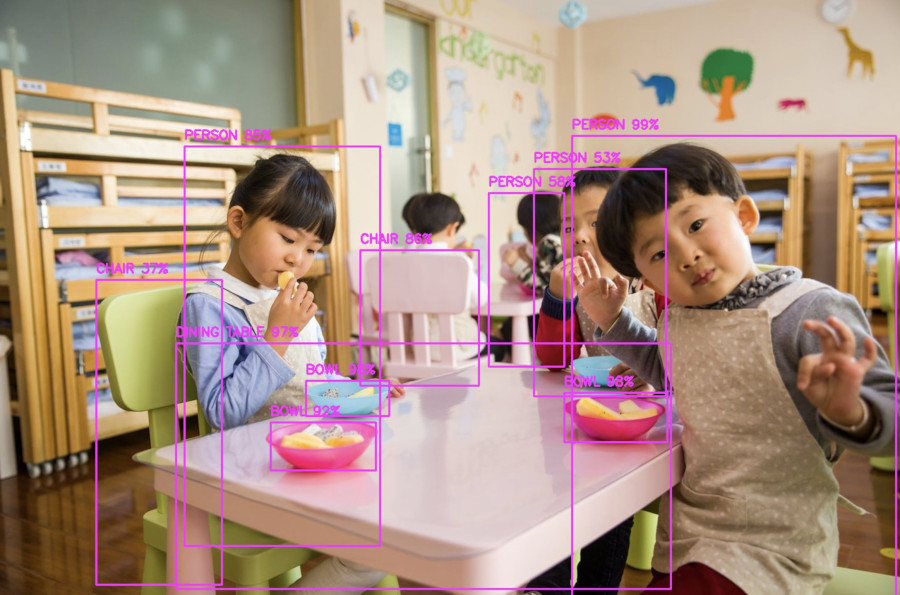
As you can see, the various kinds of objects are detected and bound by bounding rectangles in Magenta.
Here is the output on three more test images, which are available in your download folder.
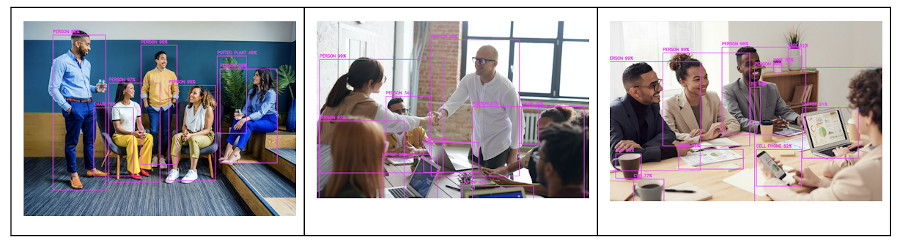
I will now explain to you how the whole thing works.
09The FindObjects Working
I will now explain the working of our earlier defined findObjects function.
In our code, we called the findObjects function by passing the image and objectInfo as parameters.
findObjects(objectInfo, image)Now, let’s look at the implementation of the findObjects function.
Within the function, we first find out the dimensions of the input image. Note that in our code of object detection in an image, we had changed this image to 320x320 pixels.
target_height, target_width = img.shape[:2]Next, we create three 3 lists to store the information of the best bounding boxes of the detected objects, the confidence value of these detected objects and the classnames of these objects.
  bbox = []
classIds = []
confs = []
We then start a nested for loop and iterate over the three outputs and within each all its detected objects.
    for output in outputs:
for d in output:
    scores = d[5:]
    classId = np.argmax(scores)
    confidence = scores[classId]
    if confidence > conf_thresh:
        w,h = int(d[2]*target_width), int(d[3]*target_height)
        x,y = (int(d[0]*target_width) - w/2), (int(d[1]*target_height) - h/2)
        bbox.append([x,y,w,h])
        classIds.append(classId)
        confs.append(float(confidence))
For each bounding box we choose the column item with the highest value (confidence value) among the 80 class columns described earlier, i.e. leaving out the 4 coordinate values and the confidence value in the 5th column. We then check if this value is greater than our confidence threshold or not, if not we reject the bounding box and move on to the next. If yes, then we append the 4 coordinates, confidence value and the column number of the best value among the 80 class columns in the three earlier declared lists.
Next we do NMS (Non Maximal Suppression), using cv2.dnn.NMSBoxes, among all the bounding boxes that are stored in our boxes list. This is done to get the best bounding boxes on the detected objects. This returns the indices of the best bounding boxes, which we store in a list with the name indices.
indices = cv2.dnn.NMSBoxes(bbox,confs,conf_thresh,nms_thresh)You can check the number of detected objects by printing the length of indices.
print(f'Number of detected objects: {len(indices)}')For each index value, we draw the box by calling the rectangle method of cv2. The method takes four coordinates, color and line thickness as its parameters. We use the putText method of cv2 to write the class name for the image, along with the confidence level of detection.
for i in indices:
i = i[0]
box = bbox[i]
x,y,w,h = int(box[0]),int(box[1]),int(box[2]),int(box[3])
#print(x,y,w,h)
cv2.rectangle(img,(x,y),(x+w,y+h),(255,0,255),2)
cv2.putText(img, f'{classnames[classIds[i]].upper()} {int(confs[i]*100)}%',(x,y-10),cv2.FONT_HERSHEY_SIMPLEX,0.6,(255,0,255),2)
The image changed by findObjects method is now displayed using the imshow function.
cv2.imshow('Image',image)The program then waits for the user to quit by pressing any key.
cv2.waitKey(0)You may now try running the program on another image of your choice to see what objects it detects in it.
Next, we move on to detect objects in a video.
10Object Detection in a Video
Here, I will show you how to detect objects in a pre-recorded video. A video is nothing but a collection of images (or frames). Thus, to detect objects in a video stream, we just need to continuously detect objects in each of its frames. I have already provided a pre-recorded video in the source download for your testing. You call VideoCapture method of cv2 to capture the frames in the video.
elif inp == 2: #for video
video = cv2.VideoCapture('data/video01.mp4')
We read the frames from the stream by calling the read method on the video object.
    while True:
success, img = video.read()
The img object returned by the read function is just an image similar to what we used in our earlier code. The object detection, drawing bounding boxes along with the class names and confidence level code, remains the same as that for a still image.
      blob_img = cv2.dnn.blobFromImage(img,1/255,(input_size,input_size),[0,0,0],1,crop=False)
nnet.setInput(blob_img)

layerNames = nnet.getLayerNames()

outputNames = [layerNames[i[0]-1] for i in nnet.getUnconnectedOutLayers()]

outputs = nnet.forward(outputNames)

findObjects(outputs, img)

cv2.imshow('Vid',img)
For each frame, we display the changed image to the user so that the user will see the continuous detection of objects in the full video stream during its play. The output produced on the sample video is shown here:
We display each frame for one millisecond and quit the loop when the user presses “q”.
        if cv2.waitKey(1) & 0xFF == ord("q"):
cv2.destroyAllWindows()
break11Object Detection in a Live Stream
The code for detecting objects in a live stream and a pre-recorded video remains the same, except for a minor difference, and that is how the video is captured. For a pre-recorded video, we specified the name of the video file as a parameter to the VideoCapture function. Just replace this with value zero to capture the stream from your webcam.
elif inp == 3: #for webcam
video = cv2.VideoCapture(0)
I have captured a self-video on my webcam, which you can observe here.
Now, let us look at the latest developments in YOLO.
12Object Detection Using YOLO V4
YOLO V4 is a faster and more accurate object detector which was proposed in April 2020. The original paper[3] is sited in the references. The YOLO V4 has a better CNN than that of YOLO V3 and hence can provide better and faster accuracy. You can detect objects using YOLO V4 the same way as we did for YOLO V3, you just need to use the weights and configuration file for YOLO V4 while initializing the neural network. The entire process of re-creating the model has been quite simplified, as you will see it shortly in the code that follows.
13Importing YOLO V4 Library
Import the YOLO V4 library along with the other libraries as in the earlier case.
import numpy as np
import cv2
import warnings
warnings.filterwarnings('ignore')14Initializing YOLO V4
Create a class instance.
yolo = YOLOv4()Set the instance variable to the pre-defined class names. This is the same coco.names file that you had used in version 3.
yolo.classes = "files/coco.names"15Creating Model
Create the model by calling the make_model method on the instance.
yolo.make_model()Initialize the model by assigning the pre-trained weights.
yolo.load_weights("files/yolov4.weights", weights_type="yolo")16Detecting Objects in an Image
To detect objects and inferring the output, that is drawing boxes, etc. is now much simplified in version 4. You simply need to call the inference method.
yolo.inference(media_path="data/image00.jpg")17Detecting Objects in a Video
To detect objects in a video, you just need to set the media_path to your desired video file.
yolo.inference(media_path="data/video01.mp4", is_image=False)Thus, the entire object detection code has been very much simplified in version 4 by encapsulating most of the functionality that we discussed for version 3 in a single yolo class.
18Summary:
YOLO is a super fast actual time object detection model that can detect 80 different types of objects in a still image or a pre-recorded/live video. The version 3 of YOLO required you to use OpenCV for object detection. The version 4 provides the entire object detection and inference functionality in an encapsulated class, making it a lot simpler to implement object detection code in your applications.
In the next part of this tutorial, I will explain how to perform Image Segmentation on images and videos. Till then!

Arka Dyuti Kundu
Project idea, development and technical writing.
6 articles on ABCOM Education